Introduction to JWT in Modern Java Development
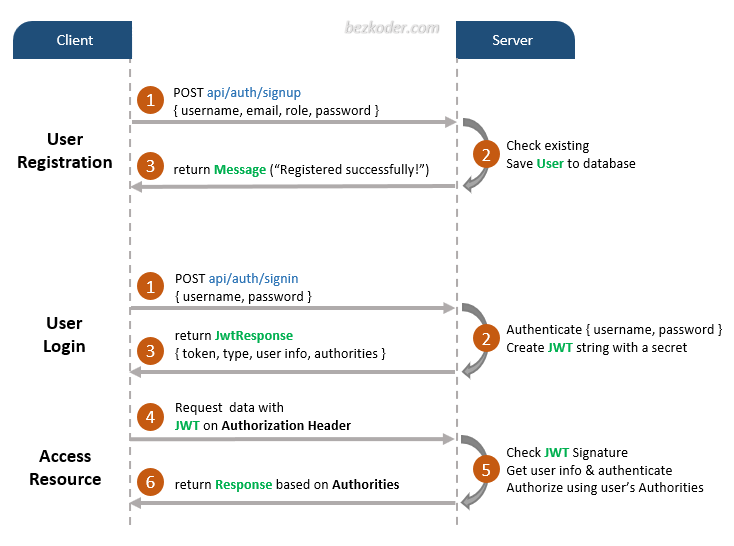
In the world of modern web applications, particularly in distributed systems like Java Microservices, stateless authentication has become the gold standard. At the heart of this paradigm lies the JSON Web Token, or JWT. A JWT is a compact, URL-safe means of representing claims to be transferred between two parties. It allows servers to verify the authenticity of requests without needing to maintain session state, making it a perfect fit for scalable, high-performance Java REST APIs built with frameworks like Spring Boot or Jakarta EE.
A JWT is not just a random string; it’s a structured, self-contained token with three distinct parts: a header, a payload, and a signature. The header specifies the cryptographic algorithm, the payload contains the claims (user information, permissions, etc.), and the signature ensures the token’s integrity. This design makes JWTs a powerful tool for securing endpoints, managing user sessions, and securely transmitting information. This article provides a comprehensive deep dive into using JWTs in Java, from fundamental concepts and practical implementation using popular libraries to advanced security techniques and production-ready best practices. Whether you’re working with Java 17, Java 21, or building a complex Java Enterprise application, understanding JWT is a critical skill for any modern Java backend developer.
Core Concepts: The Anatomy of a JWT
Before writing any Java code, it’s essential to understand the structure of a JSON Web Token. A JWT consists of three parts separated by dots (.), each of which is Base64Url encoded:
<header>.<payload>.<signature>
Let’s break down each component to understand its role in the authentication and authorization process.
1. The Header
The header typically consists of two parts: the token type, which is JWT, and the signing algorithm being used, such as HMAC SHA-256 (HS256) or RSA (RS256). This JSON object is then Base64Url encoded to form the first part of the JWT.
{
  "alg": "HS256",
  "typ": "JWT"
}
2. The Payload (Claims)
The second part of the token is the payload, which contains the claims. Claims are statements about an entity (typically, the user) and additional data. There are three types of claims: registered, public, and private claims.
- Registered Claims: These are a set of predefined claims which are not mandatory but recommended. Some common examples include
iss(issuer),exp(expiration time),sub(subject), andiat(issued at). - Public Claims: These can be defined at will by those using JWTs but should be defined in the IANA JSON Web Token Registry or be a URI that contains a collision-resistant namespace.
- Private Claims: These are custom claims created to share information between parties that agree on using them and are neither registered nor public claims.
{
  "sub": "1234567890",
  "name": "John Doe",
  "email": "john.doe@example.com",
  "iat": 1516239022,
  "exp": 1516242622,
  "roles": ["ADMIN", "USER"]
}
Important Note: The payload is Base64Url encoded, not encrypted. This means anyone can decode and read its contents. Therefore, you should never store sensitive information like passwords in the JWT payload.
3. The Signature
The signature is used to verify that the sender of the JWT is who it says it is and to ensure that the message wasn’t changed along the way. To create the signature, you take the encoded header, the encoded payload, a secret, and the algorithm specified in the header and sign that. For example, if you are using the HMAC SHA-256 algorithm, the signature will be created in the following way:
HMACSHA256(base64UrlEncode(header) + "." + base64UrlEncode(payload), secret)
This signature is the cornerstone of JWT security. If a malicious user tampers with the payload, the signature will become invalid, and the server will reject the token.
Practical Implementation: Generating and Validating JWTs in Java
To work with JWTs in Java, we’ll use one of the most popular and robust libraries: Java JWT (JJWT). First, you need to add the dependency to your project. For Java Maven projects, add the following to your pom.xml:
<!-- pom.xml -->
<dependencies>
    <dependency>
        <groupId>io.jsonwebtoken</groupId>
        <artifactId>jjwt-api</artifactId>
        <version>0.12.5</version>
    </dependency>
    <dependency>
        <groupId>io.jsonwebtoken</groupId>
        <artifactId>jjwt-impl</artifactId>
        <version>0.12.5</version>
        <scope>runtime</scope>
    </dependency>
    <dependency>
        <groupId>io.jsonwebtoken</groupId>
        <artifactId>jjwt-jackson</artifactId>
        <version>0.12.5</version>
        <scope>runtime</scope>
    </dependency>
</dependencies>
Creating a JWT Service
A common design pattern, especially in Java Spring Boot applications, is to encapsulate JWT logic within a dedicated service class. This service will handle token generation, validation, and claim extraction.
Let’s create a JwtService class. A crucial first step is generating a secure key. We should avoid using simple string secrets and instead use a cryptographically strong key.
import io.jsonwebtoken.Claims;
import io.jsonwebtoken.Jwts;
import io.jsonwebtoken.SignatureAlgorithm;
import io.jsonwebtoken.io.Decoders;
import io.jsonwebtoken.security.Keys;

import javax.crypto.SecretKey;
import java.util.Date;
import java.util.HashMap;
import java.util.Map;
import java.util.function.Function;

public class JwtService {

    // It's crucial to keep this secret safe and not hardcoded in a real application
    private static final String SECRET_KEY = "your-super-strong-and-long-secret-key-for-hs256-which-is-at-least-32-bytes";

    public String generateToken(String username) {
        Map<String, Object> claims = new HashMap<>();
        return createToken(claims, username);
    }

    private String createToken(Map<String, Object> claims, String subject) {
        Date now = new Date();
        // Token is valid for 1 hour
        Date expirationDate = new Date(now.getTime() + 1000 * 60 * 60);

        return Jwts.builder()
                .claims(claims)
                .subject(subject)
                .issuedAt(now)
                .expiration(expirationDate)
                .signWith(getSigningKey(), Jwts.SIG.HS256)
                .compact();
    }

    private SecretKey getSigningKey() {
        byte[] keyBytes = Decoders.BASE64.decode(SECRET_KEY);
        return Keys.hmacShaKeyFor(keyBytes);
    }

    public <T> T extractClaim(String token, Function<Claims, T> claimsResolver) {
        final Claims claims = extractAllClaims(token);
        return claimsResolver.apply(claims);
    }

    private Claims extractAllClaims(String token) {
        return Jwts.parser()
                .verifyWith(getSigningKey())
                .build()
                .parseSignedClaims(token)
                .getPayload();
    }

    public String extractUsername(String token) {
        return extractClaim(token, Claims::getSubject);
    }

    public Date extractExpiration(String token) {
        return extractClaim(token, Claims::getExpiration);
    }

    private boolean isTokenExpired(String token) {
        return extractExpiration(token).before(new Date());
    }

    public boolean isTokenValid(String token, String username) {
        final String extractedUsername = extractUsername(token);
        return (extractedUsername.equals(username) && !isTokenExpired(token));
    }
}
In this example, the generateToken method creates a JWT with the username as the subject and an expiration time of one hour. The isTokenValid method checks if the token belongs to the correct user and hasn’t expired. The extractAllClaims method is the core of the validation process; it uses the secret key to parse the token. If the signature is invalid or the token is malformed, it will throw an exception, which is a key part of the security mechanism.
Advanced Techniques: Refresh Tokens and Asymmetric Keys
While the basic implementation is solid, real-world Java applications often require more advanced security measures. Let’s explore two important concepts: refresh tokens and asymmetric cryptography.
The Refresh Token Strategy
A common security dilemma is choosing an expiration time for access tokens. Short-lived tokens are more secure but can harm user experience by forcing frequent re-logins. Long-lived tokens are convenient but pose a significant risk if stolen. The refresh token pattern solves this problem.
The flow is as follows:
- Upon successful login, the server issues two tokens: a short-lived access token (e.g., 15 minutes) and a long-lived refresh token (e.g., 7 days).
- The client uses the access token to authenticate with protected API endpoints.
- When the access token expires, the client sends the refresh token to a special
/refresh-tokenendpoint. - The server validates the refresh token (checking if it’s expired or has been revoked) and, if valid, issues a new access token.
This strategy significantly improves security. If an access token is compromised, it’s only useful for a very short time. The refresh token is only sent to one specific endpoint, reducing its exposure. Refresh tokens should be securely stored (e.g., in an HttpOnly cookie) and can be invalidated on the server side if a security breach is suspected.
Using Asymmetric Cryptography (RS256)
The HMAC-based algorithm (HS256) we used earlier relies on a single shared secret key for both signing and verifying tokens. This is simple and effective for monolithic applications. However, in a Java Microservices architecture, it becomes problematic. Every service that needs to validate a JWT would need access to the same secret key, increasing the risk of exposure.
Asymmetric cryptography (e.g., RS256, which uses RSA) solves this by using a key pair: a private key and a public key.
- The private key is kept secret by the authentication server and is used to sign the JWTs.
- The public key can be freely distributed to all other microservices. They use it to verify the JWT signature.
This way, resource servers can confirm a token’s authenticity without having the ability to create new tokens. Here’s how you can generate a key pair and use it with JJWT:
import io.jsonwebtoken.Jwts;
import io.jsonwebtoken.security.Keys;
import java.security.KeyPair;
import java.security.PrivateKey;
import java.security.PublicKey;

public class RsaJwtExample {

    // In a real app, load these from a keystore or secure storage
    private static final KeyPair keyPair = Keys.keyPairFor(Jwts.SIG.RS256);
    private static final PrivateKey privateKey = keyPair.getPrivate();
    private static final PublicKey publicKey = keyPair.getPublic();

    public String generateRsaToken(String subject) {
        return Jwts.builder()
                .subject(subject)
                .signWith(privateKey) // Sign with the private key
                .compact();
    }

    public boolean validateRsaToken(String token) {
        try {
            Jwts.parser()
                .verifyWith(publicKey) // Verify with the public key
                .build()
                .parseSignedClaims(token);
            return true;
        } catch (Exception e) {
            // e.g., SignatureException, ExpiredJwtException
            System.err.println("Token validation failed: " + e.getMessage());
            return false;
        }
    }

    public static void main(String[] args) {
        RsaJwtExample rsaJwtExample = new RsaJwtExample();
        String token = rsaJwtExample.generateRsaToken("user@example.com");
        System.out.println("Generated RSA Token: " + token);

        boolean isValid = rsaJwtExample.validateRsaToken(token);
        System.out.println("Is token valid? " + isValid);
    }
}
This approach is fundamental for building scalable and secure distributed systems with Java, as it decouples token verification from token issuance.

Java JWT Best Practices and Common Pitfalls
Implementing JWTs correctly is crucial for your application’s security. Adhering to best practices can help you avoid common vulnerabilities.
Key Security Best Practices
- Use Strong Keys: Never hardcode secrets in your source code. Use environment variables, a configuration server (like Spring Cloud Config), or a dedicated secrets management tool (like HashiCorp Vault or AWS Secrets Manager). For HS256, the secret should be at least 256 bits (32 characters) long and randomly generated.
- Enforce HTTPS: JWTs only provide integrity and authentication, not confidentiality. The payload is visible to anyone who intercepts the token. Always transmit JWTs over a secure channel (HTTPS) to prevent man-in-the-middle attacks.
- Set an Expiration Claim (
exp): All tokens should have a short expiration time to limit the window of opportunity for an attacker if a token is compromised. Use the refresh token pattern for better user experience. - Validate All Necessary Claims: When parsing a token, don’t just verify the signature. Also, validate the issuer (
iss) and audience (aud) claims if they are used, to ensure the token was issued by the correct authority for your application. - Don’t Store Sensitive Data in the Payload: Remember, the payload is readable. Avoid storing personally identifiable information (PII) or other sensitive data directly in the token. Store a user ID and fetch the necessary data from your database on the server side.
Common Pitfalls to Avoid
- Token Invalidation (Logout): By design, JWTs are stateless and cannot be easily invalidated before their expiration. If a user logs out or their account is compromised, their active JWTs remain valid. To implement a true logout, you need a server-side token blacklist (e.g., using Redis or a database) to check against upon every request. This introduces state but is often a necessary trade-off for security.
- Algorithm Confusion Attacks: Some older libraries allowed attackers to change the algorithm in the header from RS256 to HS256. Modern libraries like JJWT protect against this by requiring you to specify the verification key, which is tied to a specific algorithm. Always use up-to-date libraries.
- Excessive Payload Size: JWTs are sent in the header of every authenticated request. A large payload with many claims can increase network latency and impact Java performance. Keep the payload as lean as possible.
Conclusion and Next Steps
JSON Web Tokens are a powerful and flexible standard for implementing stateless authentication and authorization in modern Java applications. We’ve explored the fundamental structure of a JWT, demonstrated how to generate and validate tokens using the JJWT library, and discussed advanced techniques like refresh tokens and asymmetric signatures for building secure, scalable Java Microservices. By following security best practices—such as using strong keys, enforcing HTTPS, and keeping tokens short-lived—you can leverage JWTs to create robust and reliable systems.
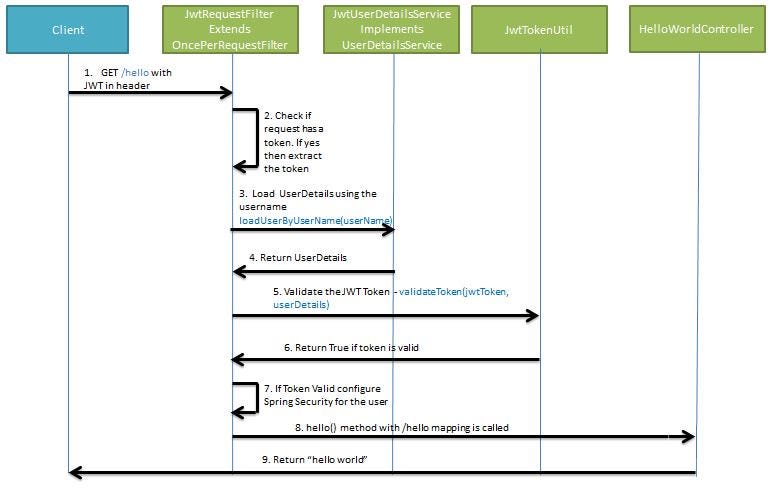
Your journey with JWT Java doesn’t end here. The next logical step is to integrate this knowledge into a full-fledged security framework like Spring Security. By combining JWTs with Spring Security’s filters and authentication providers, you can build a comprehensive security layer for your Java REST API. Further exploration could involve diving into OAuth 2.0 and OpenID Connect, which use JWTs as a core component for federated identity and delegated authorization in complex enterprise ecosystems.